Feedburner is essentially an add-on service for your blog that tracks people who subscribe to your blog using RSS. RSS is a web technology that means “really simple syndication” … in normal speak, that just means it’s a technology that lets different programs latch onto your website (blog) and grab your content.

People subscribe to your “RSS feed” so they can read the content of your blog either in their e-mail, or using a program or web application of some sort, such as Google Reader.
So, Feedburner takes the regular RSS feed your blog creates (your blog creates this automatically most of the time) and grabs it, gives it a new address, tracks anyone who subscribes to that address, and provides other nerdy goodies.
The most important part to get, is that it allows more ways for people to “grab” (subscribe) to your blog, and then allows you to see a number on how many people have taken purposeful action to follow your website.
Basically, this little icon below becomes a little more important if you are at the point in tracking metrics for your site.
You’ll see now if people click on your RSS button.

Here are a few of the most important reasons:
Although the benefits aren’t near-endless they are good enough to spend a small amount of time investing in time required to find the right system for your blog and then customizing it for excellence!
RSS Feed is the way to receive any update, whether it is new post from your fvorite blogger, or new picture or any video or any update from your favorite website and blog, in your e-mail. You don’t need to visit that site to get latest information, you will receive all updates into your e-mail if you subscribe RSS feed.
Feed Reader is software which allows you to collect the RSS feeds from many websites at single time and display them into your e-mail to read and use those RSS feeds. The examples of Feed reader are Google reader and bloglines etc.
FeedBurner E-mail is a tool which is subscribed by blogger and site publisher on their blog so that their reader could get every new update of site or every new published post in his e-mail section, instead he visit the site and then read.

#2: Enter your feed address in the given space, as like i entered in following image.

#3: Enter click on the “Next” button.

#4: A new window will appear before you, where two options are given. You have to click on the 2nd option and click on “Next” button.

#5: Now you are required to enter your Website Title, Feed address. After enter the required information, click the “Next”.

#6: Press the “Next” Button without any amendment. No need to click anywhere in this step. Just click on the “Next” button.

#7: Now Stats configuration page opened on your screen. Click on “Clickthroughs” and “I want more”. Then click to the Next.

Now!!You have successfully added the feedburner feed on your blog.

#01: From the same page, Click on “Publicize” button, as illustrated in following image.

#02: Click on the “Chicklet Chooser”, given in the left menu at end.

Then Copy the HTML Code, given at the end of the same page.

#03: After copying this code, go to blogger.com and, visit appearance> widget.
#04: Click on the Desired Sidebar to expand. Add text widget to desired sidebar by dragging it from “available widget” into sidebar on right.

#05: Widget will automatically open, add HTML Code which you copied previously from feedburner and click on the “Save”.
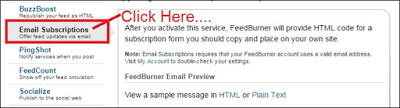
#01: From the same page, Click on “Publicize” button, as illustrated in following image.

#02: Click on the “Email Subscription”, given in the left menu.
#03: Click on the “Activate button” to move into the next step.

#04: Then Copy the HTML Code, given at the end of the same page.

#05: Click on the Desired Sidebar to expand. Add text widget to desired sidebar by dragging it from “available widget” into sidebar on right.

#07: Widget will automatically open, add HTML Code which you copied previously from feedburner and click on the “Save”.
Now readers will simply enter their e-mails in e-mail subscription bar and then verify it by visiting their e-mail. Readers will get now all updates in their e-mail section, instead to open and visit your site.
However it should be noted that Feedburner only allows you to export the emails of your subscibers. It does not provide you with a option to send personalize email to your list. In order to send a personalize email to your subscribers you will either need to use SendBlater Email Sending Software or any other email service like Getreponse and Aweber.
#2:- Now click on “Publicize” button.

#3:- Click on “Subscription Management” button located at center left side of the page.

#4:- Find “View Subscriber Details” and click on it. You will see the list of email addresses of all your subscribers. The list will contain the total number of subscribers which includes all the email subscribers and those who have used third party subscription services to subscribe to your blog. For example Feedly, BlogLines, Netvibes etc…

#5:- Click on “Export CSV” button and save the file. (The file will be in MS Excel format)
Now all your subscriber email addresses have been exported into a CSV file. You can use any service to send emails to your subscribers however make sure to checkout MailChimp which allows you to send upto 20,000 emails to 2000 email subscribers. In Mailchimp you will first need to important your subscribers emails and a one time confirmation email will be sent to your subscribers. All the subscribers who will confirm their email will be added to your list and then you send free emails via MailChimp.
People subscribe to your “RSS feed” so they can read the content of your blog either in their e-mail, or using a program or web application of some sort, such as Google Reader.
So, Feedburner takes the regular RSS feed your blog creates (your blog creates this automatically most of the time) and grabs it, gives it a new address, tracks anyone who subscribes to that address, and provides other nerdy goodies.
The most important part to get, is that it allows more ways for people to “grab” (subscribe) to your blog, and then allows you to see a number on how many people have taken purposeful action to follow your website.
Basically, this little icon below becomes a little more important if you are at the point in tracking metrics for your site.
You’ll see now if people click on your RSS button.
Introduction to FeedBurner
One of the most important things that you’ll want to do very early on with your new blog is sign up for a RSS Tracking System to not only track your RSS Subscribers through a 3rd party system but to also analyze and execute against the information that they can gather for you.Here are a few of the most important reasons:
- Tracking your RSS readers will help you gain more readers as you’ll be able to track usage patterns, click throughs, and even more neat information.
- Tracking your RSS readers helps significantly keep you competitive and positive with your growth. I consider growth of my RSS readers as a foundational part of my short term goals strategy.
- Some systems provide opportunities for you to actually monetize your RSS Subscriptions which can help your bottom line!
- Some RSS Subscription Services include some email subscription services which can cater to some of your users who would rather read your content in that form. By offering this you can get more readers and more traffic.
- Many RSS services can help you optimize your content delivery for many different RSS readers which will allow for greater mass-consumption of your content.
- Some RSS services allow customization of the look-and-feel of the content as it shows up in RSS readers!
- Some RSS services can help notify content distribution networks when you publish your content as well as provide direct channels into your social networking tools.
- And more!
Although the benefits aren’t near-endless they are good enough to spend a small amount of time investing in time required to find the right system for your blog and then customizing it for excellence!
What is FeedBurner E-mail
If you want that when you publish a post on your blog, it automatically notified by my blog readers, than subscribe feedburner e-mail. Feedburner e-mail is a service which allows its publishers and bloggers to notify and deliver their content to their subscribers through their e-mail. I was totally confused when I studied about feedburner e-mail, RSS feed and feed readers.RSS Feed is the way to receive any update, whether it is new post from your fvorite blogger, or new picture or any video or any update from your favorite website and blog, in your e-mail. You don’t need to visit that site to get latest information, you will receive all updates into your e-mail if you subscribe RSS feed.
Feed Reader is software which allows you to collect the RSS feeds from many websites at single time and display them into your e-mail to read and use those RSS feeds. The examples of Feed reader are Google reader and bloglines etc.
FeedBurner E-mail is a tool which is subscribed by blogger and site publisher on their blog so that their reader could get every new update of site or every new published post in his e-mail section, instead he visit the site and then read.
Setup Feed Burner Feed
#1: Go to Feedburner. If you have no G-mail account, then make your Gmail account first, and if you already Gmail account, then simply enter your mail and password and press enter. A new screen will appear before you as like this.
#2: Enter your feed address in the given space, as like i entered in following image.

#3: Enter click on the “Next” button.

#4: A new window will appear before you, where two options are given. You have to click on the 2nd option and click on “Next” button.

#5: Now you are required to enter your Website Title, Feed address. After enter the required information, click the “Next”.

#6: Press the “Next” Button without any amendment. No need to click anywhere in this step. Just click on the “Next” button.

#7: Now Stats configuration page opened on your screen. Click on “Clickthroughs” and “I want more”. Then click to the Next.

Now!!You have successfully added the feedburner feed on your blog.

How to Add Feedburner Feed to Your Blog
You can easily do it by following the simple step by step guide.#01: From the same page, Click on “Publicize” button, as illustrated in following image.

#02: Click on the “Chicklet Chooser”, given in the left menu at end.

Then Copy the HTML Code, given at the end of the same page.

#03: After copying this code, go to blogger.com and, visit appearance> widget.
#04: Click on the Desired Sidebar to expand. Add text widget to desired sidebar by dragging it from “available widget” into sidebar on right.

#05: Widget will automatically open, add HTML Code which you copied previously from feedburner and click on the “Save”.
How to Add Feedburner E-mail Subscription to Your Blog
It is very important to add e-mail subscription burner to your blog sidebar. This is the source where blog readers subscribe themselves through entering their e-mails here. When they subscribes, they get every updated in their e-mail, whether you publish a new post, or announce a contest, whether you upload a video on your blog or some picture, they can get every alert and update in their e-mail and can read it. They don’t need to open your site. They get every update in their e-mail. You can add Feedburner subscription by following the step by step guide given below.#01: From the same page, Click on “Publicize” button, as illustrated in following image.

#02: Click on the “Email Subscription”, given in the left menu.

#03: Click on the “Activate button” to move into the next step.

#04: Then Copy the HTML Code, given at the end of the same page.

#05: Click on the Desired Sidebar to expand. Add text widget to desired sidebar by dragging it from “available widget” into sidebar on right.

#07: Widget will automatically open, add HTML Code which you copied previously from feedburner and click on the “Save”.
Now readers will simply enter their e-mails in e-mail subscription bar and then verify it by visiting their e-mail. Readers will get now all updates in their e-mail section, instead to open and visit your site.
Send Email To Your Feedburner RSS Subscribers
I was searching for a way to find out how to copy the whole list of my RSS Feed subscribers and send them a message, but did not found any article. I started playing a bit with Feedburner and finally found the way to export the list of all my subscribers to a CSV file.However it should be noted that Feedburner only allows you to export the emails of your subscibers. It does not provide you with a option to send personalize email to your list. In order to send a personalize email to your subscribers you will either need to use SendBlater Email Sending Software or any other email service like Getreponse and Aweber.
How to Copy Email Address of your RSS Feed Subscribers?
#1:- Login to your Feedburner account and click on the blog title (The blog from which you want to export email addresses)#2:- Now click on “Publicize” button.
#3:- Click on “Subscription Management” button located at center left side of the page.
#4:- Find “View Subscriber Details” and click on it. You will see the list of email addresses of all your subscribers. The list will contain the total number of subscribers which includes all the email subscribers and those who have used third party subscription services to subscribe to your blog. For example Feedly, BlogLines, Netvibes etc…
#5:- Click on “Export CSV” button and save the file. (The file will be in MS Excel format)
Now all your subscriber email addresses have been exported into a CSV file. You can use any service to send emails to your subscribers however make sure to checkout MailChimp which allows you to send upto 20,000 emails to 2000 email subscribers. In Mailchimp you will first need to important your subscribers emails and a one time confirmation email will be sent to your subscribers. All the subscribers who will confirm their email will be added to your list and then you send free emails via MailChimp.
Awesome article. Good luck for you.
ReplyDeletecheck out our latest post ...
How to verify your domain on facebook
How to unblock website from facebook & instagram
How to download windows 10 pro latest version iso file
Top 10 blogger tips and tricks । Blogger tutorial
mrlaboratory.com : All kind of internet technology tricks are share on our website.. gty7